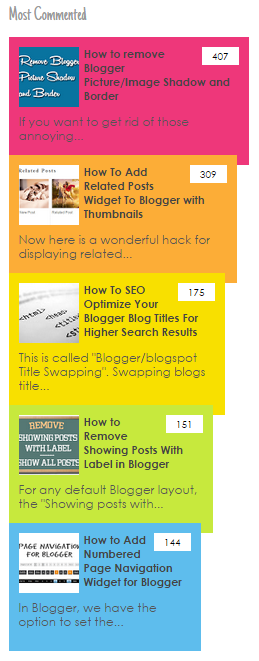
Blogger es una gran herramienta para la publicación de blogs y con algunos pequeños cambios se pueden lograr grandes resultados, tal como el gadget de hoy el cual muestra en una serie de barra de colores las entradas más comentadas del blog y al lado del titulo de la entrada se muestra el número de comentarios que tiene dicha entrada, el gadget se ve de la siguiente manera:
Para agregar este truco en tu blog, ve a la edición html de tu blog y debajo de la etiqueta </Group> agrega lo siguiente:
<Group description="Most Commented" selector=".most-commented">
<Variable name="most.commented.background1" description="background color1" type="color" default="#fa4242" value="#ee377a"/>
<Variable name="most.commented.background2" description="background color2" type="color" default="#ee6107" value="#fcad37"/>
<Variable name="most.commented.background3" description="background color3" type="color" default="#f0f" value="#f8e000"/>
<Variable name="most.commented.background4" description="background color4" type="color" default="#ff0" value="#c7e93d"/>
<Variable name="most.commented.background5" description="background color5" type="color" default="#0ff" value="#5ebded"/>
</Group>
Ahora arriba de ]]></b:skin> agrega el siguiente código:
 .comment-count {
    padding: 3px 10px;
    background: #fff;
    color: #000;
    font-size: 10px;
    float: right;
}
.most-commented ul {
    padding: 0px !important;
    font-family: Century Gothic, sans-serif;
}
.most-commented ul li {
    list-style-type: none;
    padding: 10px;
    color: #555;
    margin-top: -10px;
}
.most-commented ul li a {
    color: #444;
    font-weight: bold;
    text-decoration: none;
    font-size: 11px;
}
.most-commented ul li img {
    float: left;
    margin: 0px 5px 0px 0px;
    width: 60px;
    height: 60px;
}
.most-commented:nth-child(3n+0) {
    background: $(most.commented.background1);
    width: 100%;
}
.most-commented:nth-child(4n+0) {
    background: $(most.commented.background2);
    width: 95%;
}
.most-commented:nth-child(5n+0) {
    background: $(most.commented.background3);
    width: 90%;
}
.most-commented:nth-child(6n+0) {
    background: $(most.commented.background4);
    width: 85%;
}
.most-commented:nth-child(7n+0) {
    background: $(most.commented.background5);
    width: 80%;
}
Guarda los cambios en la plantilla.
Ahora ve a Diseño, Añadir Gadget, HTML/JavaScript y pega allí lo siguiente:
<script type="text/javascript">
function stripTags(s,n) {
    return s.replace(/<.*?>/ig,"").split(/s+/).slice(0,n-1).join(" ")
}
function mostcommented(feed) {
    var i;
    for (i = 0; i < feed.count ; i++) {
var postURL = "'" + feed.value.items[i].link + "'";
var postTitle = feed.value.items[i].title;
var postthumbnail = "<img src="+feed.value.items[i].postthumbnail+" />";
var postDescription = feed.value.items[i].postdescription;
var postComments = feed.value.items[i].commentcount;
var postList = '<div class="most-commented"><ul><li><div class="comment-count">' + postComments + "</div>" + postthumbnail + "<a href="+ postURL + '">' + postTitle + "</a>"  + '<p>' +stripTags(postDescription,10)+'...</p>' + '</li></ul></div>';
 document.write(postList);
     }
 }
 </script>
<script src="http://pipes.yahoo.com/pipes/pipe.run?
AddUrlHere=URL DE TU BLOG&NumberofPosts=5
&_id=2cb5eb603ed55a6264ee1484e5fdd45c
&_callback=mostcommented
&_render=json"
type="text/javascript"></script><span style="font-size: 80%; float:left;"><a href="http://helplogger.blogspot.com/2014/08/most-commented-posts-blogger-widget.html">Add this widget</a></span>
Ahora reemplaza URL DE TU BLOG por la URL de tu blog, la cual debe ir en el siguiente formato: http://www.miltrucosblogger.com/
Para configurar los colores del gadget ve al Diseñador de Plantillas, guíate con la siguiente manera:
Espero que este truco te haya gustado y no olvides compartirlo en las redes sociales.
Vía/Helplogger


0 comentarios